
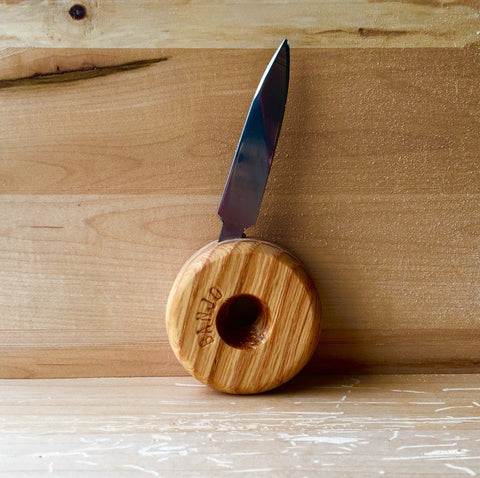
If you find shucking oysters intimidating then this is the knife for you! Designed by Canadian Oyster Shucking Champion, Jason Woodside, the Banjo Oyster Knife was created to make oyster shucking safer and easier.
The wheel-shaped handle fits comfortably in your hand and offers maximum control while applying the pushing and twisting actions needed to shuck live oysters. The shape of the handle makes easier and more intuitive.
The handles are 2″ in diameter and are made from Prince Edward Island hardwood. The blades are 2.75″ long, have a good, strong tip, and work extremely well as a torquing and cutting tool.
Banjo Oyster Knives have all the right traits! They work well for both small and large oysters, and are the perfect knife for beginners or experienced oyster shuckers alike.
With practice, good advice, and, most importantly, a quality oyster knife, shucking oysters can be easy! Here are a few tips that can help you on your way:
- First off and the most important thing for you to have a positive experience shucking oysters for yourself, you need good product and the right tool. Don’t be fooled by the temptation of cheaper oysters; you could end up ruining shells and throwing out more than you eat, or worse, breaking the shell and injuring yourself! That means having quality oysters and a quality oyster knife. What you’re looking for in the oysters are nice thick shells with a hinge that leaves you some space to insert your knife. Our Foxley River Premium Cocktails are a smaller oyster that’s excellent for beginners because of their consistently round, thick shell, deep cup, and hinges that make it easy to slide a knife into.
- Now that you’re home and ready to practice, grab yourself a kitchen towel, fold it and lay it on your counter. After giving your oysters a quick rinse with cold water, place the oyster with the cup side down on one half of the towel and fold the other half over the top of the oyster. This allows you to hold the oyster firmly against the counter while protecting your hands against any slippage.
- Holding your knife in one hand and holding down the oyster with the other, you now want to go into the hinge of the oyster with your knife at roughly a 45-degree angle. You’ll wiggle your knife back and forth in a “key-turning” motion while gently pushing in until you feel the tip of the knife breaking through the tendon. This will allow you to twist (don’t pry! You’ll break your knife) with the wide part of the knife to separate the shells. While you’re holding them apart with your knife, take your finger and thumb with your non-knife hand and hold the shells apart.
- Now that you’re holding the shells apart, take your knife and scrape the top side of the shell. The goal here is to sever the muscle from the top shell without damaging the meat.
- Once that muscle is severed from the top shell, you can discard that shell then take the oyster and slide your knife under the meat, firmly scraping the shell, and sever the muscle from the bottom shell.
- Chances are there is grit, pieces of shell, or maybe a bit of sand on the meat or around the lip of the shell, so you can take your knife and gently clean that away and place your oyster on a platter of crushed ice!
Key takeaways:
- Use a proper oyster shucking knife
- Good oysters for beginners are small, consistent, heavy-shelled, and have hinges that allow you to easily insert your knife. This makes for a much better experience when shucking.
- Do not pry! This leads to broken shells and knives. Twist the knife back and forth like turning a key while gently pushing in the hinge at a 45-degree angle.
- Scrape firmly against the shells with your cutting away the muscles. The goal is to cut the muscle from the shell while not damaging the meat (this is where practice makes perfect).